User Guide
Product Overview
Land the dream internship or job opportunity you’ve always wanted by networking more effectively using NetworkBook!
NetworkBook is a desktop contact book application built for NUS Computing students and professionals to manage information about the people they network with more efficiently than ever before.
Here’s an overview of how NetworkBook can help you manage your network of contacts better than existing alternatives:
- Search for and sort contacts by multiple networking-relevant fields (e.g. priority, courses taken/taking, specialization(s) taken/intending to take, graduation year)
- Access this application offline, with a static online page that contains user manual and download link
- Record only the information you find relevant on our application (e.g. you can assign one contact only their email and specialisation, and another contact nothing but their course)
On top of these advantages, we believe that contact management must be efficient. Therefore, NetworkBook is optimised for use via fully text based commands while still having an interactive and user-friendly visual interface. For fast typers, NetworkBook can get your contact managing done faster than existing alternatives performing a similar role.
Table of Contents
- Product Overview
- Table of Contents
- About This User Guide
- Features
- Command summary
- FAQ
About This User Guide
This user guide provides in-depth documentation on the various commands that are available in NetworkBook. These commands are grouped into 4 broad categories:
If you are a new user, this user guide provides a getting started guide to aid you with installing the application and the initial setup. You can check the FAQ section if you face any difficulty.
For more experienced users, this user guide gives an overview on how to use specific commands. You can use the table of contents to navigate to a specific command, or refer to the command summary as a help sheet.
What’s new in NetworkBook 1.3
NetworkBook 1.3 includes several new features and improvements for ease of use.
-
Additional view commands (e.g.
sortandfilter) have been introduced to let you have more control over managing displayed contacts. - Edit command has been introduced to allow you to edit contacts’ details.
- Open links and emails via our newly-introduced commands that involve NetworkBook connecting to other apps.
- Undo/redo commands have been added to help you revert mistaken/temporary command calls.
- New accessibility features have been introduced for you to easily access common commands.
- User interface has now been refined to be more clean and usable.
- Error messages are now more specific to give more helpful information.
Getting Started
- Make sure you have Java 11 installed on your computer.
- You can check that it is installed by running the command
java --versionin the command prompt/terminal.
- You can check that it is installed by running the command
-
Download the latest version of NetworkBook (
networkbook.jar) from the top of the NetworkBook GitHub releases page. - Create a new folder on your computer (e.g. on your computer desktop). You can name this folder however you want.
-
Move the
networkbook.jarfile into the folder you just created. - Open NetworkBook:
- If you are using Windows:
- Double-click the
networkbook.jarfile to open it.
- Double-click the
- If you are using MacOS:
- Open Terminal.app.
- Navigate to the folder you have created using the
cdcommand:- Type
cd, then space, into the Terminal window. - Drag the folder icon from Finder into the Terminal window.
- Press enter.
- Type
- Type in
java -jar networkbook.jar, then press enter to open the app.
- If you are using Linux:
- Open your terminal emulator app.
- Navigate to the folder you have created using
cd. - Type in
java -jar networkbook.jar, then press enter to open the app.
- If you are using Windows:
- You should now see the NetworkBook window on your screen.
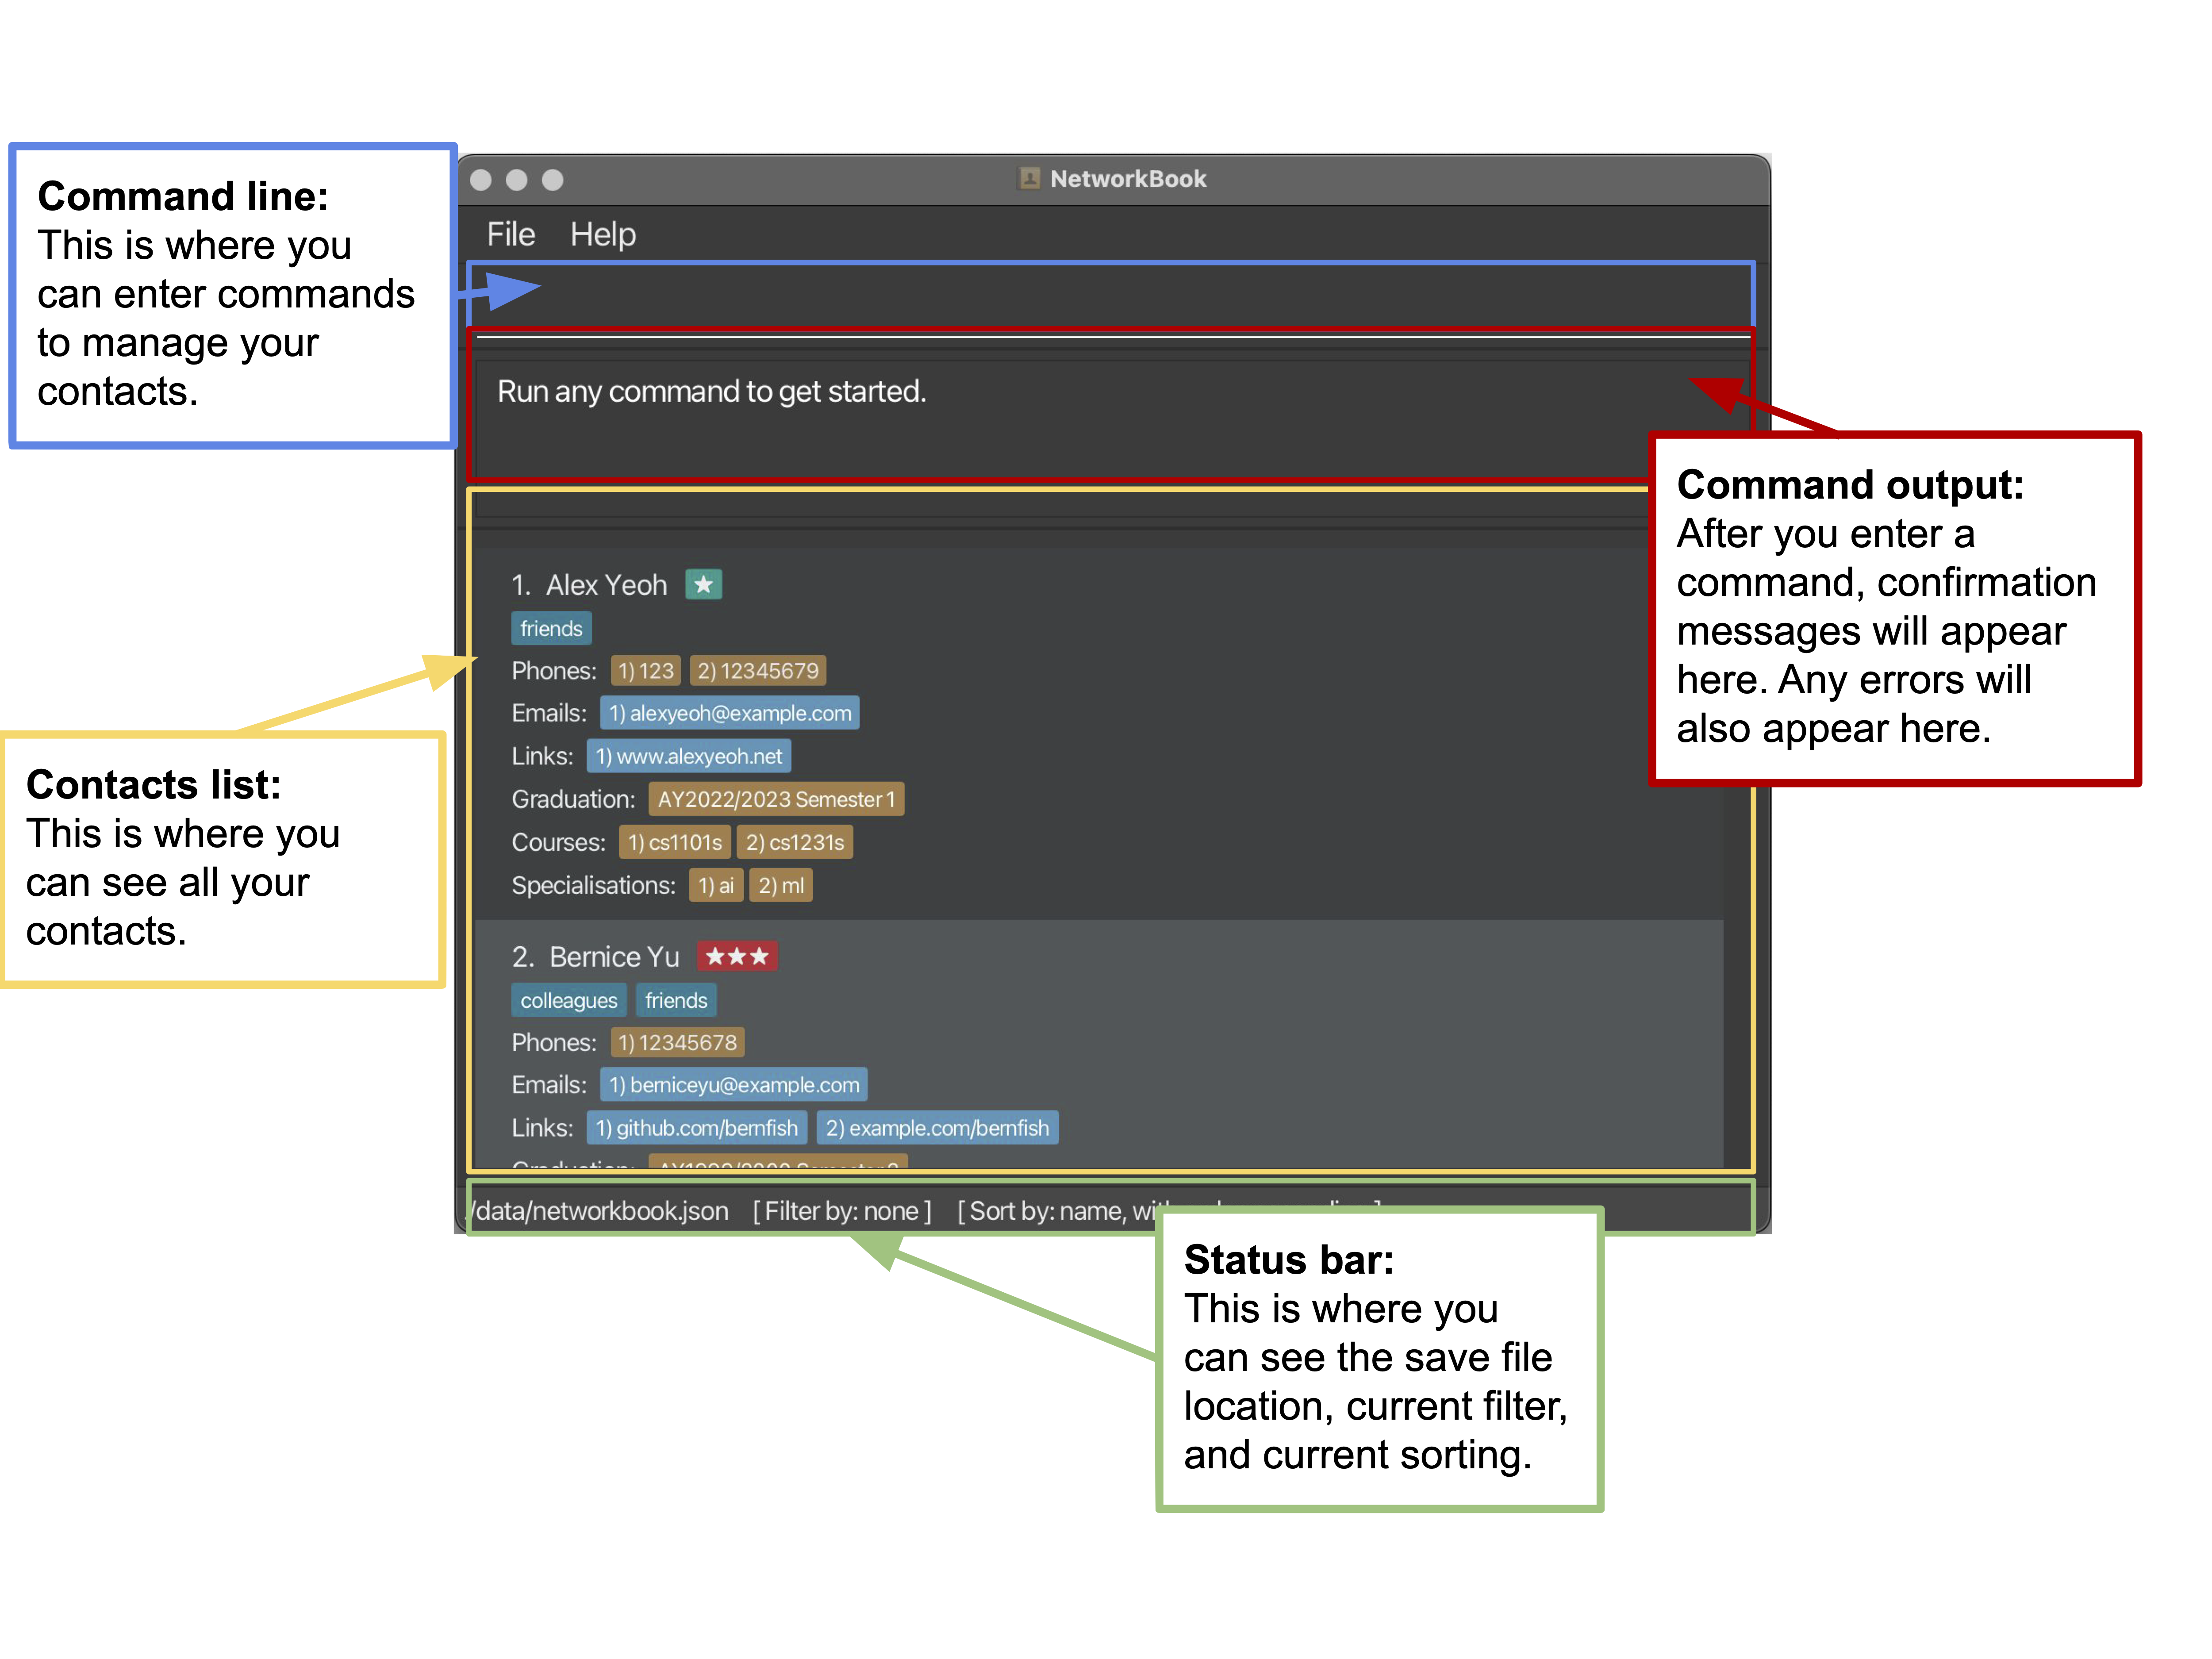
- This is what the NetworkBook window looks like:
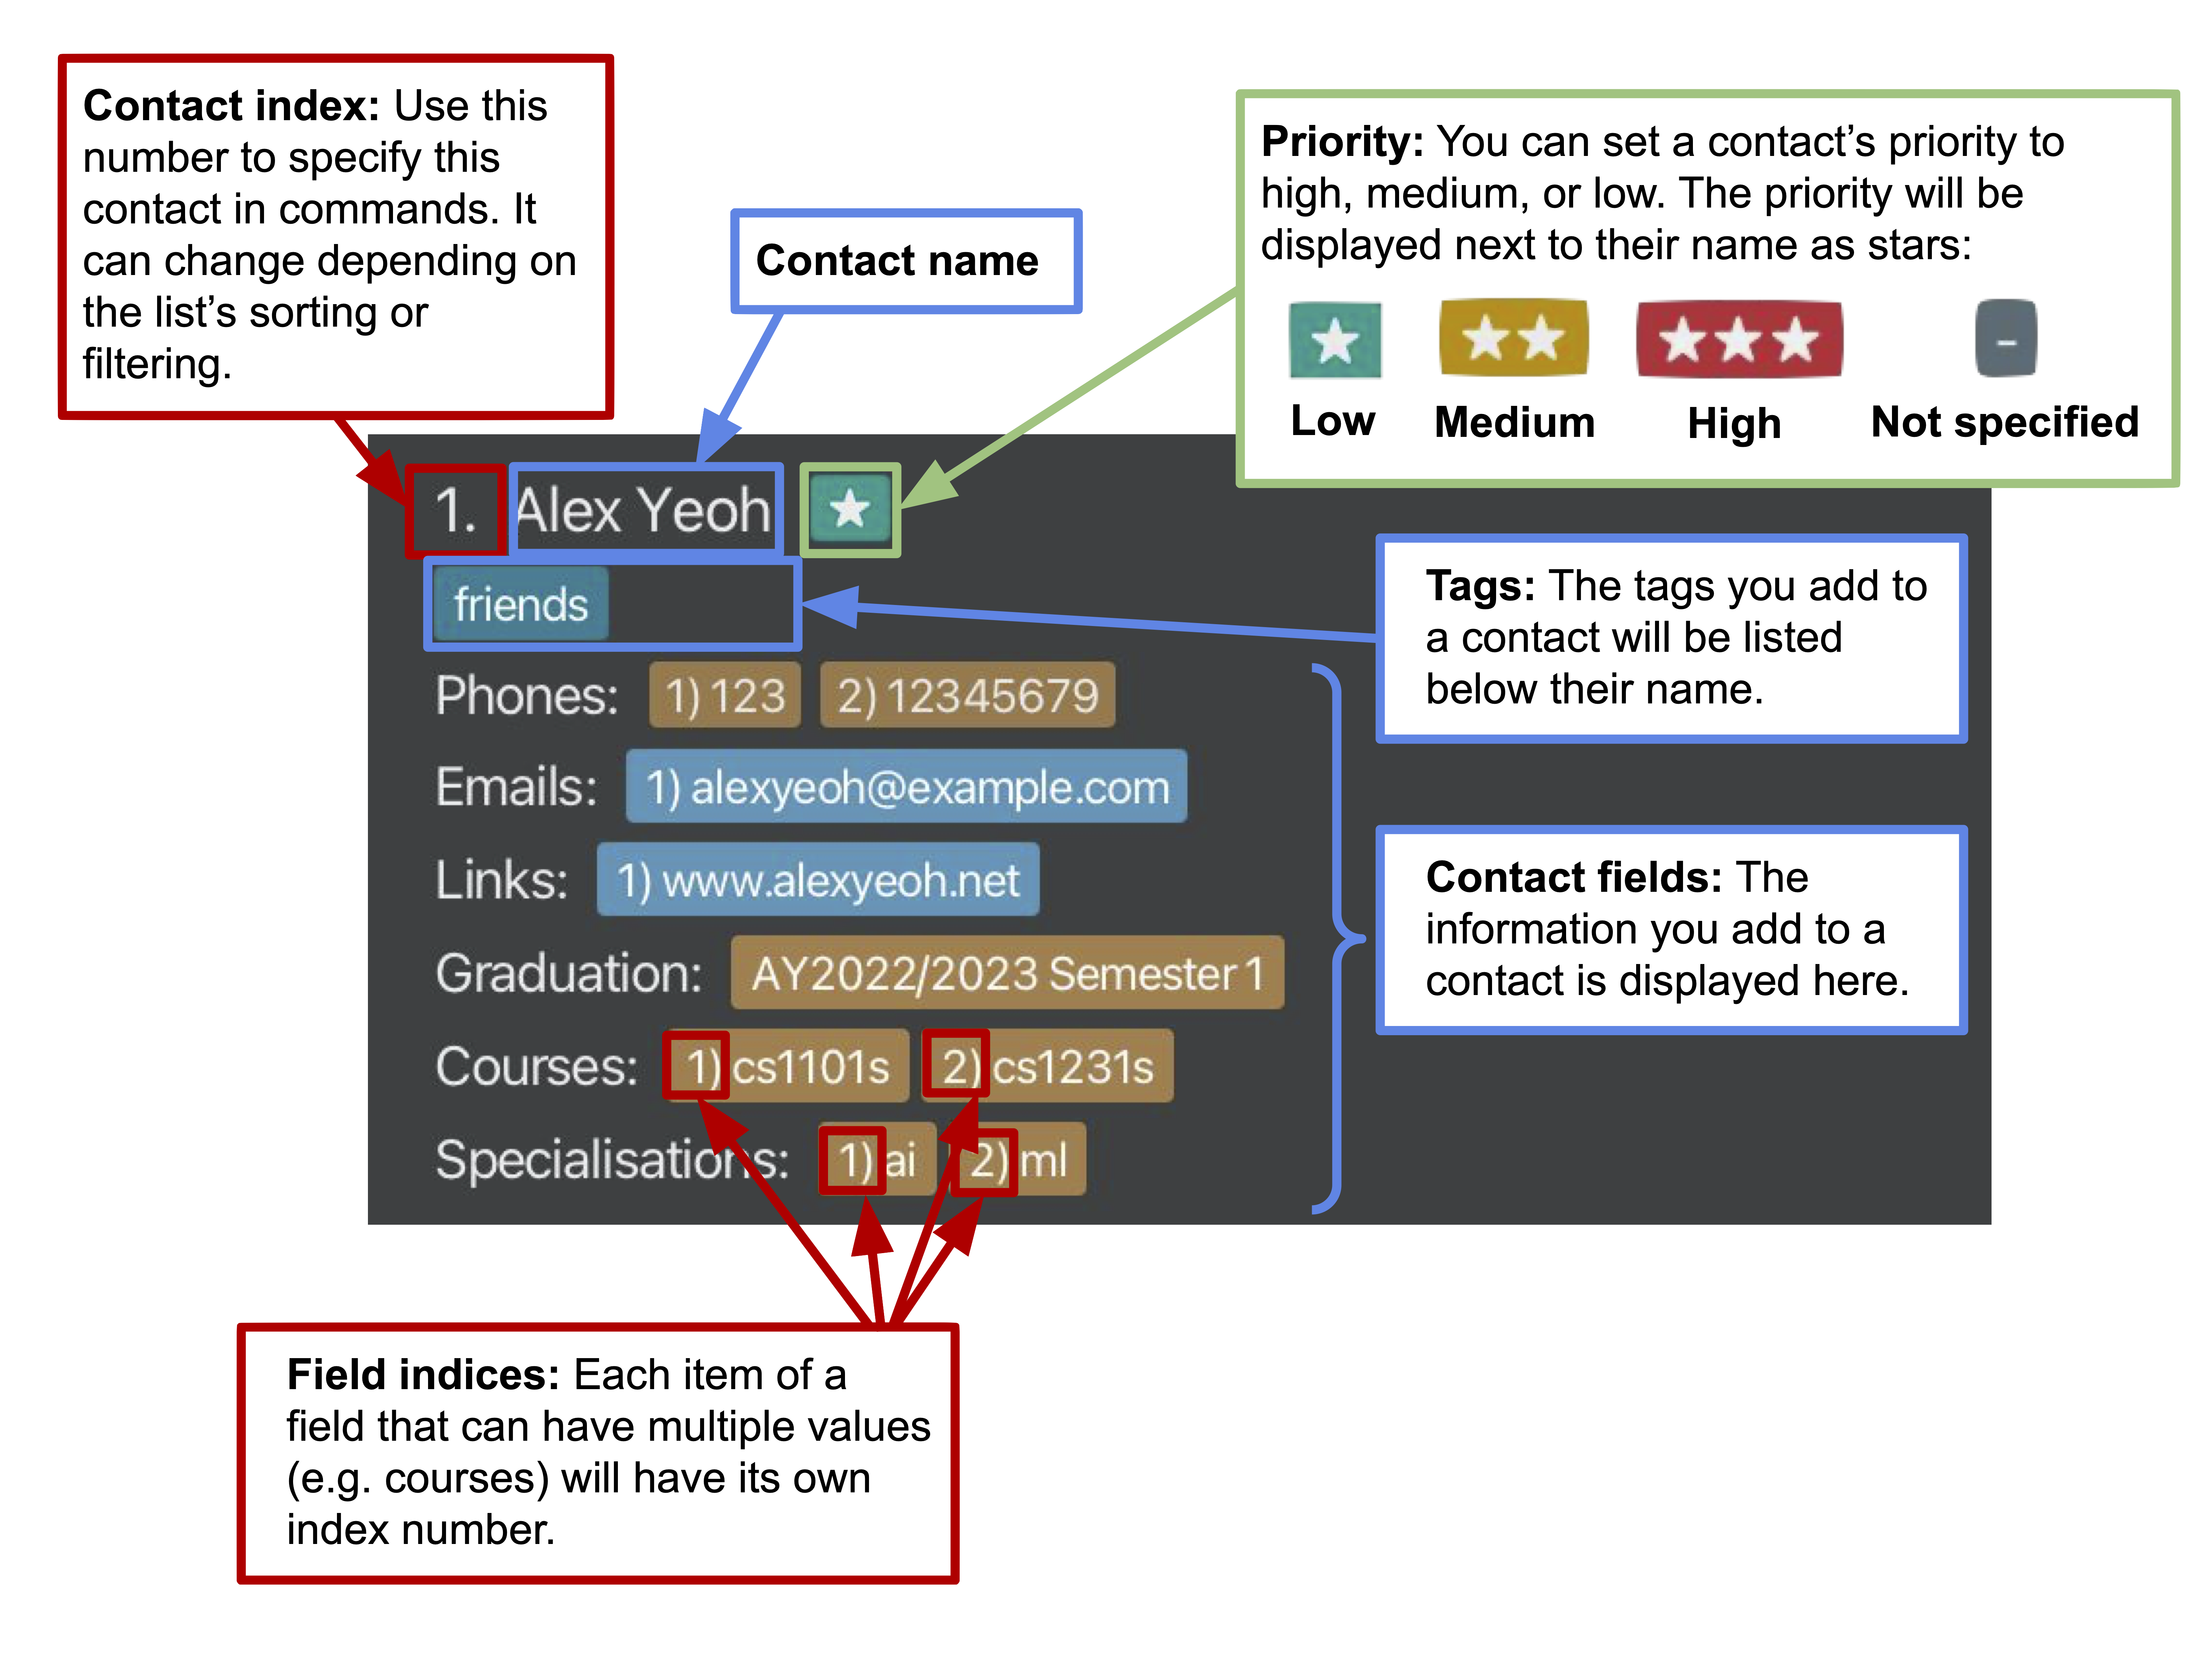
- This is what a contact in NetworkBook looks like:
- This is what the NetworkBook window looks like:
- You can now use NetworkBook! Learn more about the commands in the features section.
Features
Contact Fields
Many commands in NetworkBook allow you to specify a particular field (piece of information) of a contact to operate on. This section lists all of the available fields, as well as how you can specify them in commands.
![]() Fields and prefixes
Fields and prefixes
Each field in NetworkBook has a corresponding prefix. To specify a field in your command, follow the format of [field prefix] [field value], e.g. /name Tom.
Some fields are single-valued fields, meaning that each contact has only 1 value for each of these fields.
| Single-valued fields | Prefix | Value format | Remarks |
|---|---|---|---|
| name | /name | Any non-empty value comprising alphanumeric characters (and spaces, if any) | If a contact’s name contains non-alphanumeric characters (e.g. /), you may omit these characters in the name that you store. |
| priority level | /priority | Either high, medium or low, or the initial alphabet |
Not case-sensitive |
| graduation semester | /grad |
AYxxxx-Sye.g., AY2223-S1 for Academic Year 2022/2023 Semester 1
|
xxxx is the 4-digit representation of 2 consecutive calendar years.Academic year must be between AY1970/1971 to AY2069/2070 (inclusive). y is either 1 for Semester 1, or 2 for Semester 2. |
Other fields are multi-valued fields. Each contact has a list of different values for each of these fields.
| Multi-valued fields | Prefix | Value format | Remarks |
|---|---|---|---|
| phone numbers | /phone | Valid phone number containing numbers and optional country code (1-3 numbers with + in front) if applicable |
Phone number body (excluding country code) must be at least 3 digits long. Phone numbers with and without whitespace character are treated as different (e.g. +6512345678 is different from +65 12345678). |
| email addresses | Valid email with @ (at sign) and . (period) present after @
|
- | |
| links | /link | Valid URL link | Link must be URL-encoded. That is, it must be the same as the URL that appears on the browser’s URL bar after you visit the page. |
| courses | /course |
course_name [/start date] [/end date] e.g., CS2103T /start 01-09-2023 /end 01-12-2023
|
/start and /end indicate when the contact started and finished taking the course respectively. A course can have no dates, a start date, or a start and end date. |
| specialisations | /spec | Any non-empty value | - |
| tags | /tag | Any non-empty value | - |
In NetworkBook, you can manage contact information by changing the fields assigned to them. Following are the commands you can use to manage fields of a contact:
| Command | How does it manage the fields |
|---|---|
| create | optionally initialise certain fields when creating new contact |
| add | add more details to a field of a contact |
| edit | update some details about a field of a contact |
| delete | delete some details from a field of a contact |
![]() Indices
Indices
In NetworkBook, you often need to provide an index to specify a contact, or an entry in a multi-valued field of a contact. Indices are integers counted from 1.
Make sure to provide indices that have a corresponding item in your NetworkBook. If your command contains an invalid index, an error message will be shown.
Category 1 - Manage contact information
This category focuses on storing and modifying a contact list. It involves specific commands that allow you to add, edit and delete contact information. Relevant commands and explanations of their functionalities are outlined below:
Create new contact: create /name [name] [optional fields]
You can use the create command to create a new contact. When creating a contact, you must provide the name field, and it is optional to provide other fields which will be added to the new contact.
Format: create /name [name] [optional field prefix] [optional field value] ...
Parameters:
-
[name]is the name of the contact you wish to add. -
[optional fields]are non-mandatory fields you can associate with the contact at the point of creation.
![]() Non-mandatory fields you can associate with a contact at the point of creation comprise the contact’s
Non-mandatory fields you can associate with a contact at the point of creation comprise the contact’s phones, emails, links, graduation semester, courses, specialisations, tags and priority level. (These fields can also be subsequently added to the contact using the add command.)
To view a comprehensive list of fields and their prefixes, go to the Contact Fields section.
Example usage:
-
create /name Jiale /phone 12345678 /grad AY2526-S2
In the screenshot above, the contact “Jiale” has been created. Jiale’s index number depends on the list’s current sorting - in this case, “Jiale” is #6 when sorted by name.
-
create /name Jiale
Add details to contact: add [index] [fields]
You can use the add command to add contact details under fields associated with an existing contact. No new contact will be created.
Format: add [index] [field prefix] [field value] ...
Parameters:
-
[index]is the index of the contact in the list. -
[field prefix]specifies the corresponding field to add. -
[field value]is the value to add to the field specified by the preceding prefix.
You can add multiple fields with one add command by entering multiple sets of [field prefix] and [field value].
![]() Fields you can add contact details to for an existing contact comprise the contact’s
Fields you can add contact details to for an existing contact comprise the contact’s phones, emails, links, graduation semester, courses, specialisations, tags and priority level.
To view a comprehensive list of fields and their prefixes, go to the Contact Fields section.
1 already has the phone number 12345678, the command add 1 /phone 12345678 does nothing.
Example usage:
-
add 1 /phone 91234567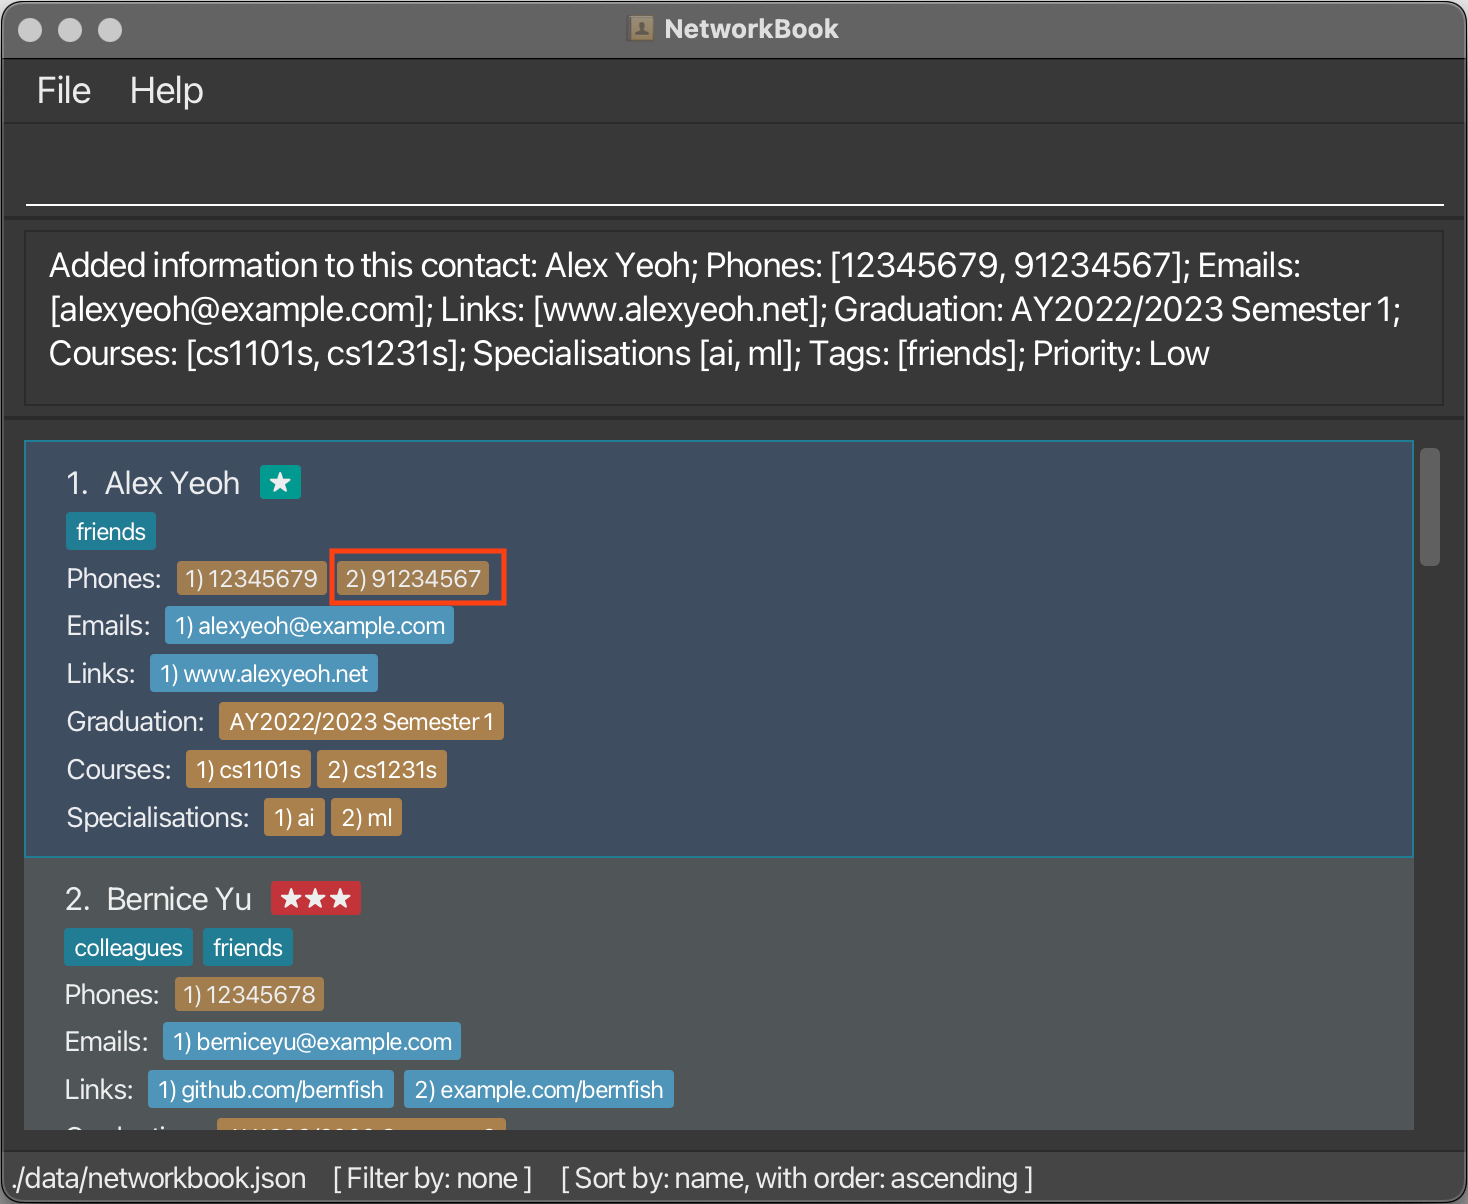
In the screenshot above, the phone number
91234567has been added to contact #1 (Alex Yeoh). add 2 /grad AY2223-S1add 3 /link https://nknguyenhc.github.io /email nknguyentdn@gmail.comadd 1 /priority high /tag data analyst /course CS1101S /spec Robotics & AI
Edit contact details: edit [index] [field] [options]
You can use the edit command to edit contact details of existing contacts in your NetworkBook so that you can update outdated/invalid information in your NetworkBook.
Format:
- Edit single-valued field:
edit [index of contact] [field prefix] [field value] - Edit an entry of a multi-valued field:
edit [index of contact] [field prefix] [field value] /index [index of entry]
Parameters:
-
[index of contact]is the index of the contact in the list. -
[field prefix]specifies the field of information to edit. -
[field value]is the new value to replace the original value with. -
[index of entry]for a multi-valued field is the index of the element in the list representing that field.
For single-valued fields, the /index prefix should not be used.
For multi-valued fields, the /index prefix is optional and at most 1 index can be specified at a time.
![]() Fields you can edit contact details for in an existing contact comprise the contact’s
Fields you can edit contact details for in an existing contact comprise the contact’s name, phones, emails, links, graduation semester, courses, specialisations, tags and priority level.
To view a comprehensive list of fields and their prefixes, go to the Contact Fields section.
Example usage:
-
edit 3 /priority low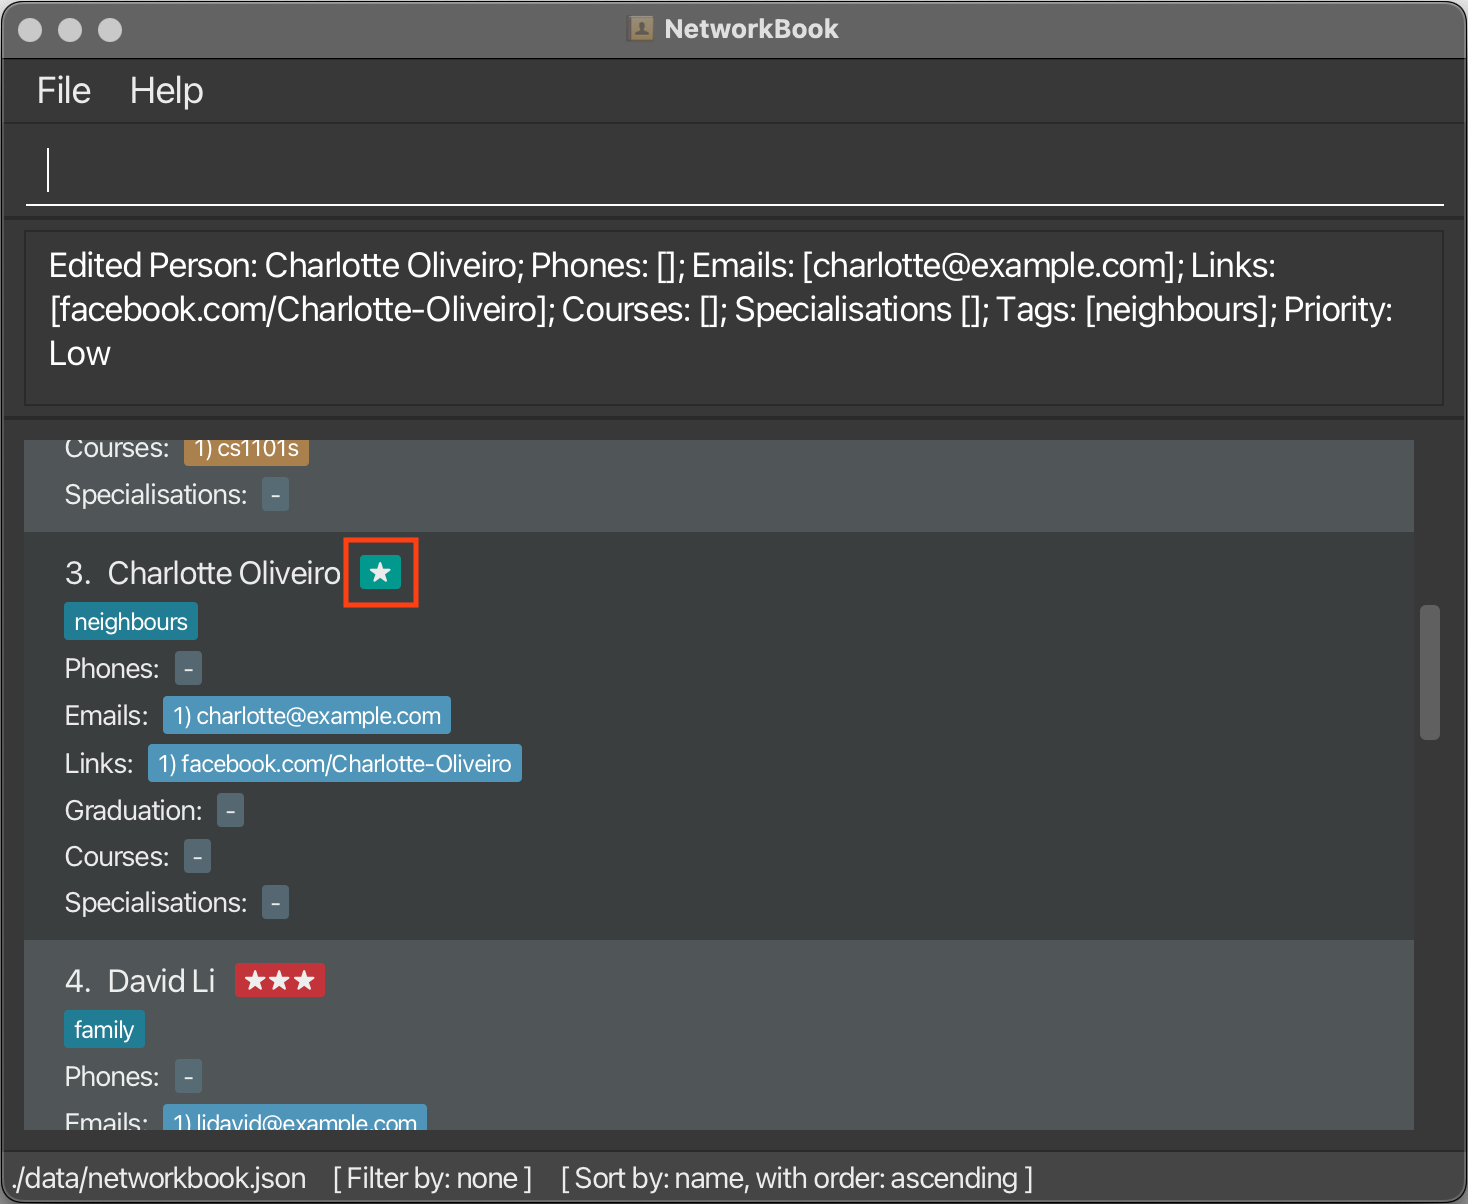
In the screenshot above, contact #3 (Charlotte Oliveiro)’s priority has been changed to
low(1 star) edit 2 /phone 10938472 /index 1edit 3 /email nkn@gmail.com
Delete a contact: delete [index]
You can remove a contact from your NetworkBook using the delete command, so that your NetworkBook only contains contact details of those relevant.
Format: delete [index]
Parameters:
-
[index]is the index of the contact in the list.
Example usage:
-
delete 6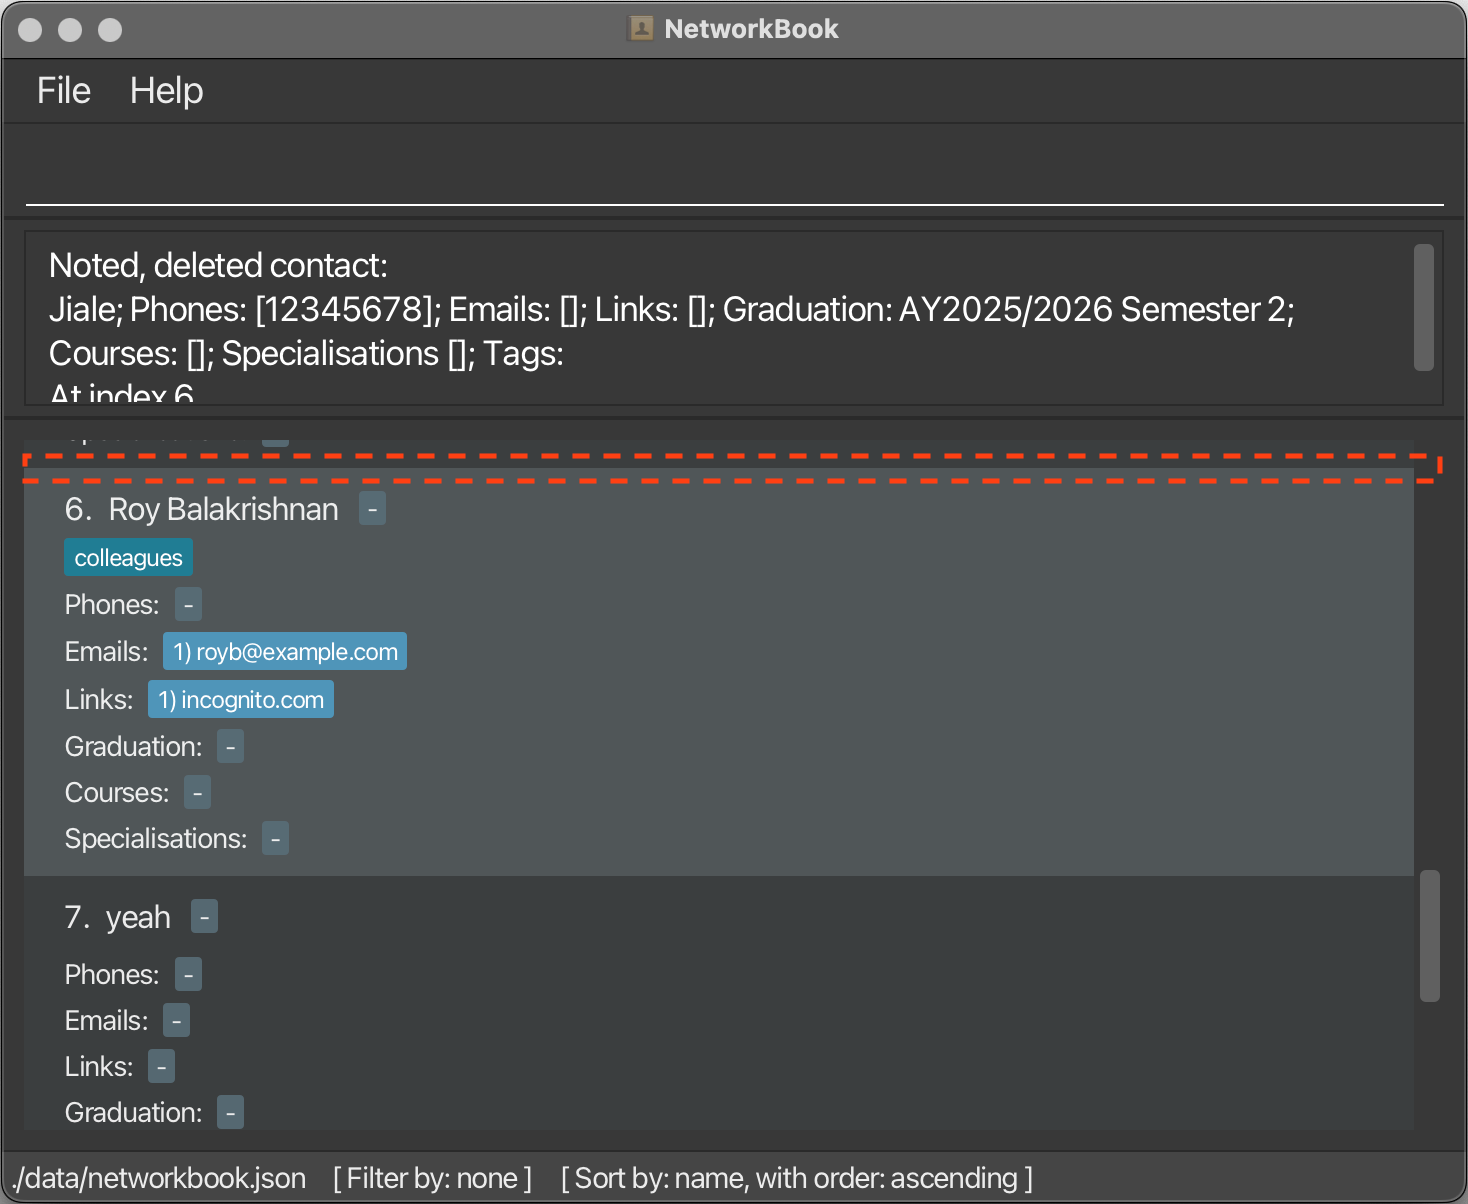
In the screenshot above, the contact previously numbered #6 (Jiale) has been deleted.
-
delete 1
Delete some details: delete [index] [field prefix] [options]
You can also use the delete command to remove some information about a contact that you previously recorded.
Format:
- Delete single-valued field:
delete [index of contact] [field prefix] - Delete an entry of a multi-valued field:
delete [index of contact] [field prefix] /index [index of entry]
Parameters:
-
[index of contact]is the index of the contact in the list. -
[field prefix]specifies the field of information to delete. -
[index of entry]for a multi-valued field is the index of the element in the list representing that field.
For single-valued fields, the /index prefix should not be used.
For multi-valued fields, the /index prefix is optional and at most 1 index can be specified at a time.
![]() Fields you can delete contact information for in an existing contact comprise the contact’s
Fields you can delete contact information for in an existing contact comprise the contact’s phones, emails, links, graduation semester, courses, specialisations, tags and priority level.
To view a comprehensive list of fields and their prefixes, go to the Contact Fields section.
Example usage:
-
delete 1 /phone /index 2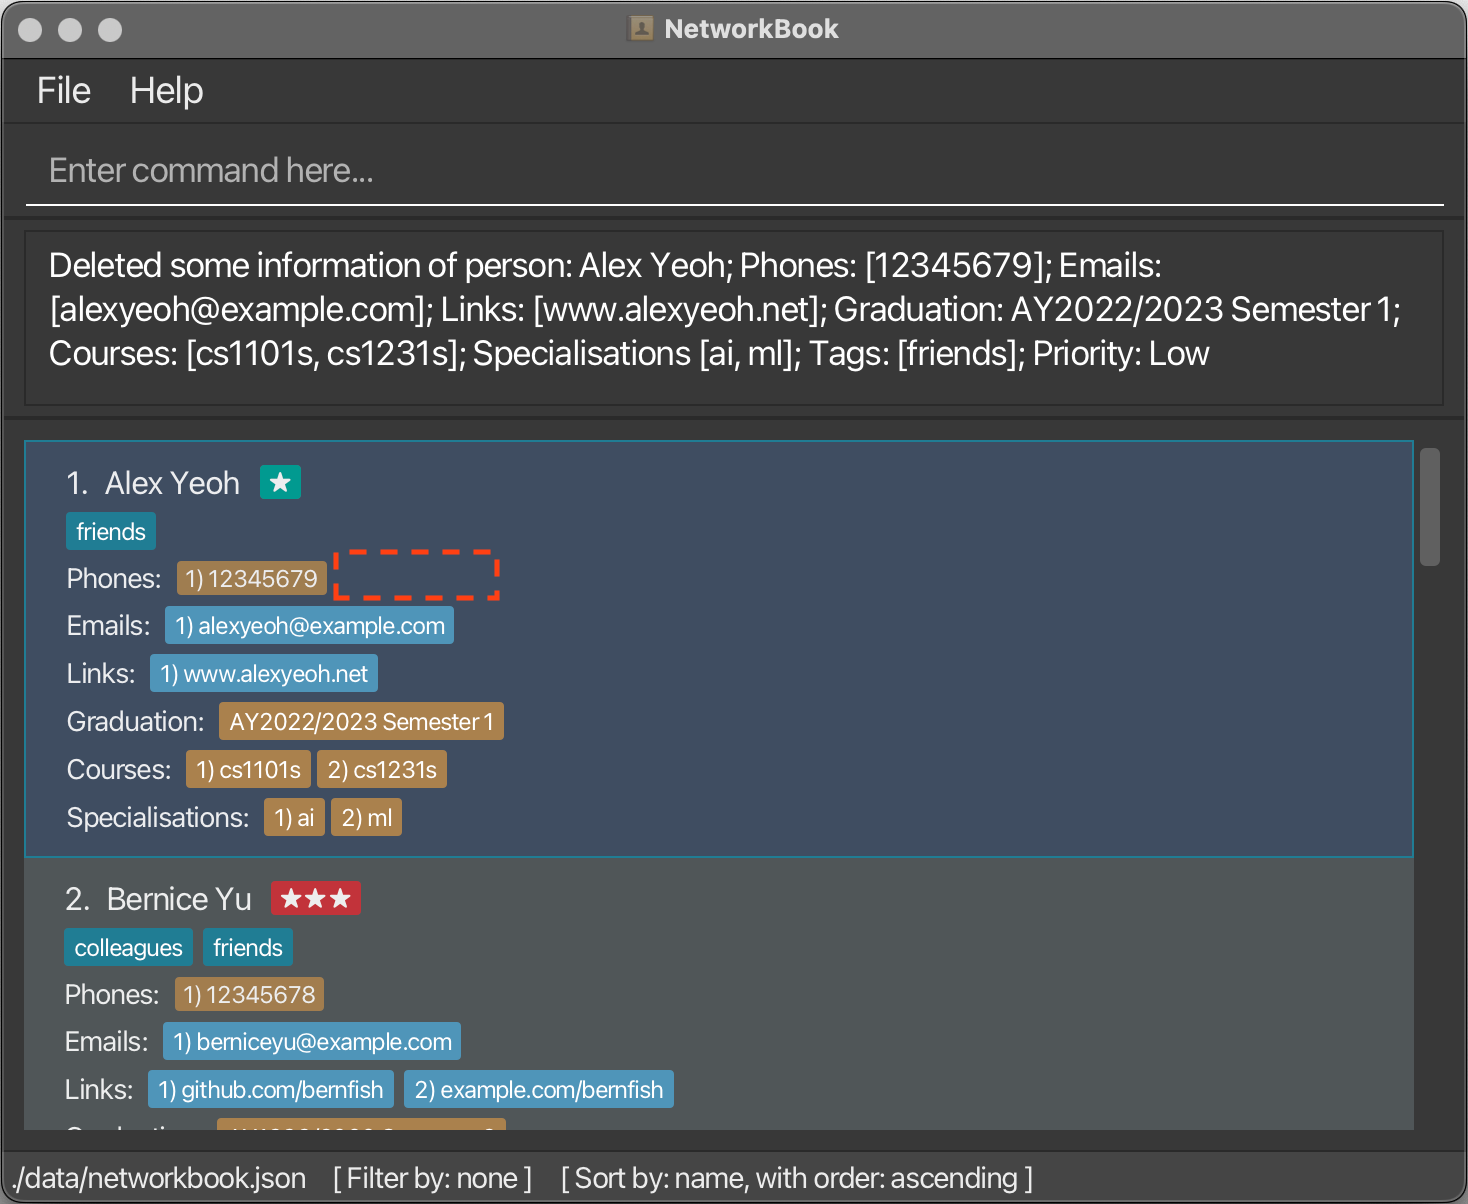
In the screenshot above, the 2nd phone number of contact #1 (Alex Yeoh) has been deleted.
delete 5 /link /index 2delete 10 /priority
Delete all contacts: clear
You can remove all contacts from your NetworkBook using the clear command, so that you can repopulate NetworkBook with a new set of contact details more efficiently.
undo.
Format: clear
Parameters: N/A
Example usage:
clear
Category 2 - View contact details
This category is centered around displaying and using contact details you previously stored. It contains commands that allow you to retrieve and use information efficiently. Relevant commands and explanations of their functionalities are outlined below:
List all contacts: list
You can use the list command to list all of your contacts. This resets any filtering previously applied to the list, so that you can quickly toggle to see all contacts.
Format: list
Parameters: N/A
Example usage:
list
Find a contact: find [name]
You can use the find command to search for contacts by their name, so that you can quickly reference a particular contact’s details.
If the list is currently sorted in a particular manner (using sort), the updated list will also be sorted in the same manner.
Format: find [name]
Parameters:
-
[name]is a term found in the names of the contacts you wish to find.
Filter by: name. The find command will also override a filter command if you used it, and vice versa.
Example usage:
-
find Dav
-
find Kai Jie
Sort contacts list: sort /by [field name] /order [asc/desc]
You can use the sort command to sort your list of contacts, so that you can efficiently locate contacts with special characteristics that you are looking for.
If the list is currently filtered in a certain manner (using find or filter), the updated list will also be filtered in the same manner.
Format: sort /by [field] /order [order]
Parameters:
-
[field]is the information to sort by. You can specify the following fields:-
name: Sort alphabetically by contact name -
grad: Sort chronologically by graduation year -
priority: Sort by priority
-
-
[order](optional) is the order to sort in (defaults to ascending if not specified). You can specify the following orders:-
asc/ascending: Sort in ascending order -
desc/descending: Sort in descending order
-
graduation or priority), all contacts without that field will be placed at the bottom of the sorted list regardless of sorting order.
Example usage:
-
sort /by grad /order desc
sort /by name /order ascendingsort /by name
Filter contacts list: filter /by [field] /with [term]
You can use the filter command to filter your list of contacts, temporarily hiding contacts that don’t contain certain keywords for easy viewing. If the list is currently sorted (using sort), the newly filtered list will be still be sorted in the same manner as before.
Format: filter /by [field] /with [term] /taken [taken]
Parameters:
-
[field]is the information to filter by. You can specify the following fields:-
course: Filter to contacts whose courses contain one one of the terms -
tag: Filter to contacts whose tags contain one of the terms -
spec: Filter to contacts whose specialisations contain one of the terms -
grad: Filter to contacts who graduated in a specific year
-
-
[term]is the terms that will be filtered against. All contacts in the filtered contact list must have part of the[term]in the[field]specified above.
-
[taken](optional). Only for filtering bycourse, this parameter additionally filters out contacts who have finished/haven’t started the course as of the current date of your system. You can specify the following values:-
true: Remove contacts who have finished/haven’t started the course as of the current date of your system. -
false(default): Include all contacts with matching course terms in the filtered list regardless of course dates.
-
taken compares the dates of the course with the current date of
your system. It does not factor in other fields like graduation year.
Example usage:
-
filter /by tag /with friend colleague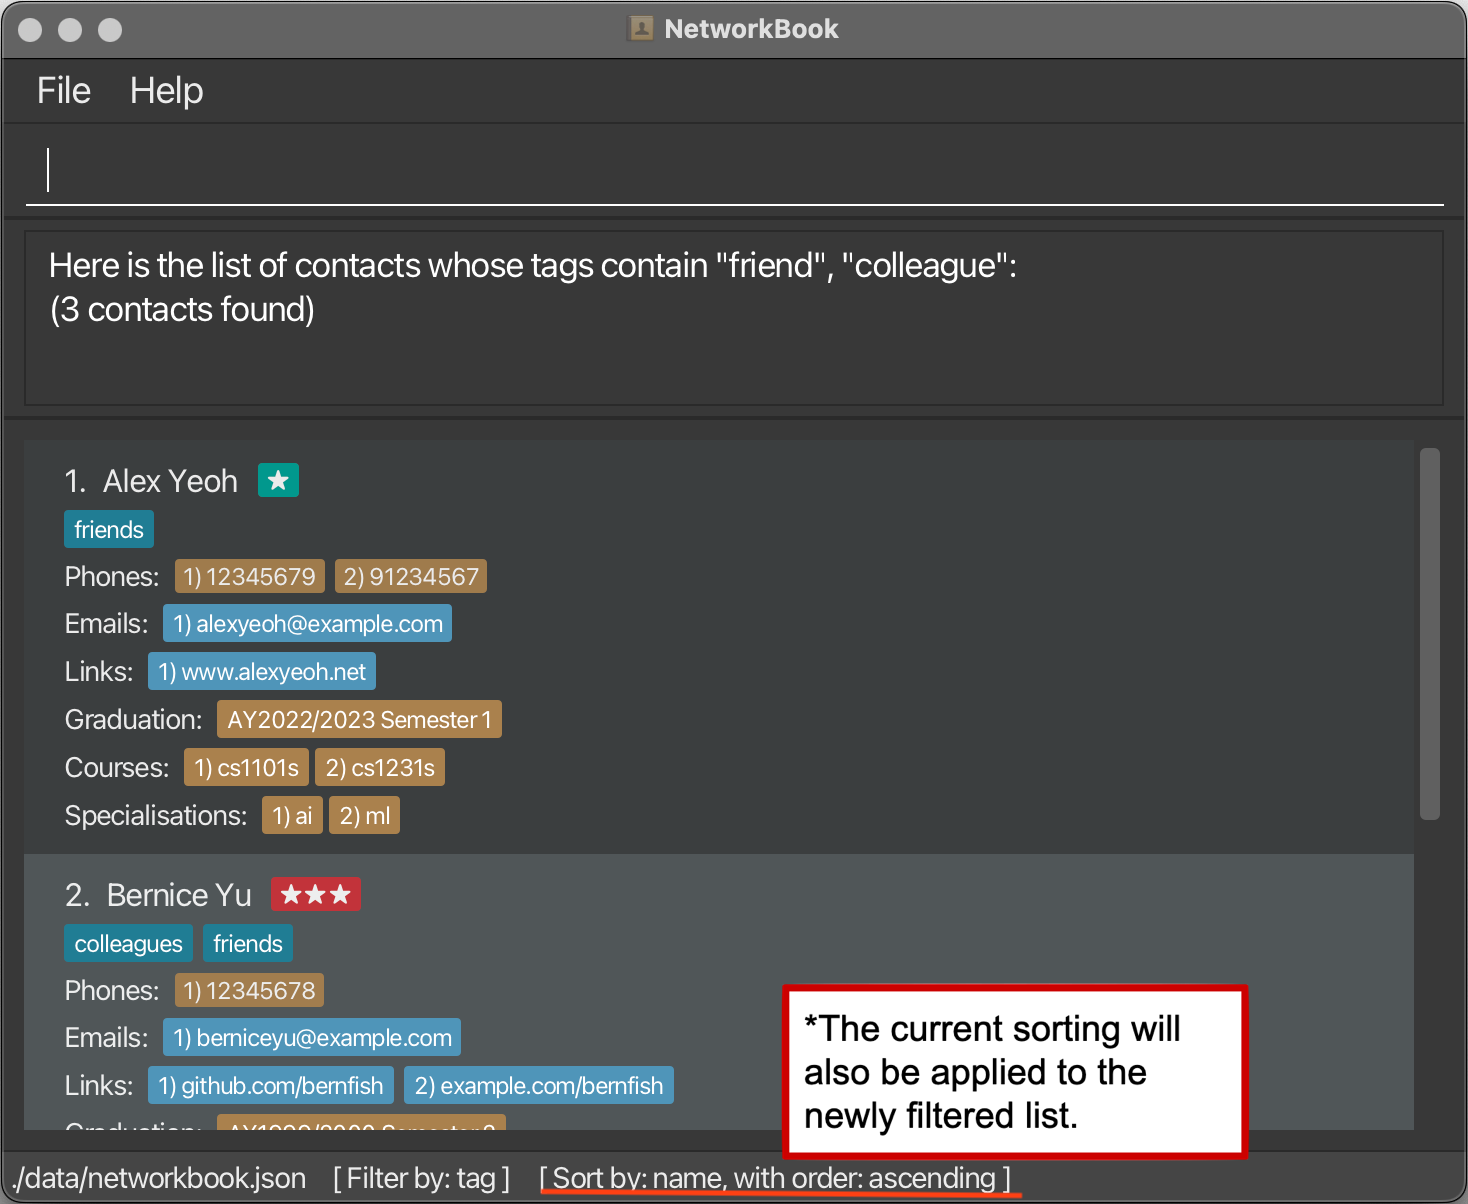
-
filter /by course /with computer /taken true -
filter /by course /with robotics -
filter /by spec /with Industry AI -
filter /by grad /with 2022 2023 2024 2025
Open a contact’s link: open [index] /index [link index]
You can use the open command to open a contact’s link so that you can conveniently access their social links when needed. This opens the webpage in your default web browser.
Format: open [index] /index [link index]
Parameters:
-
[index]is the index of the contact in the list. -
[link index]is the index of the link within the contact’s link list.
Example usage:
-
open 2 /index 2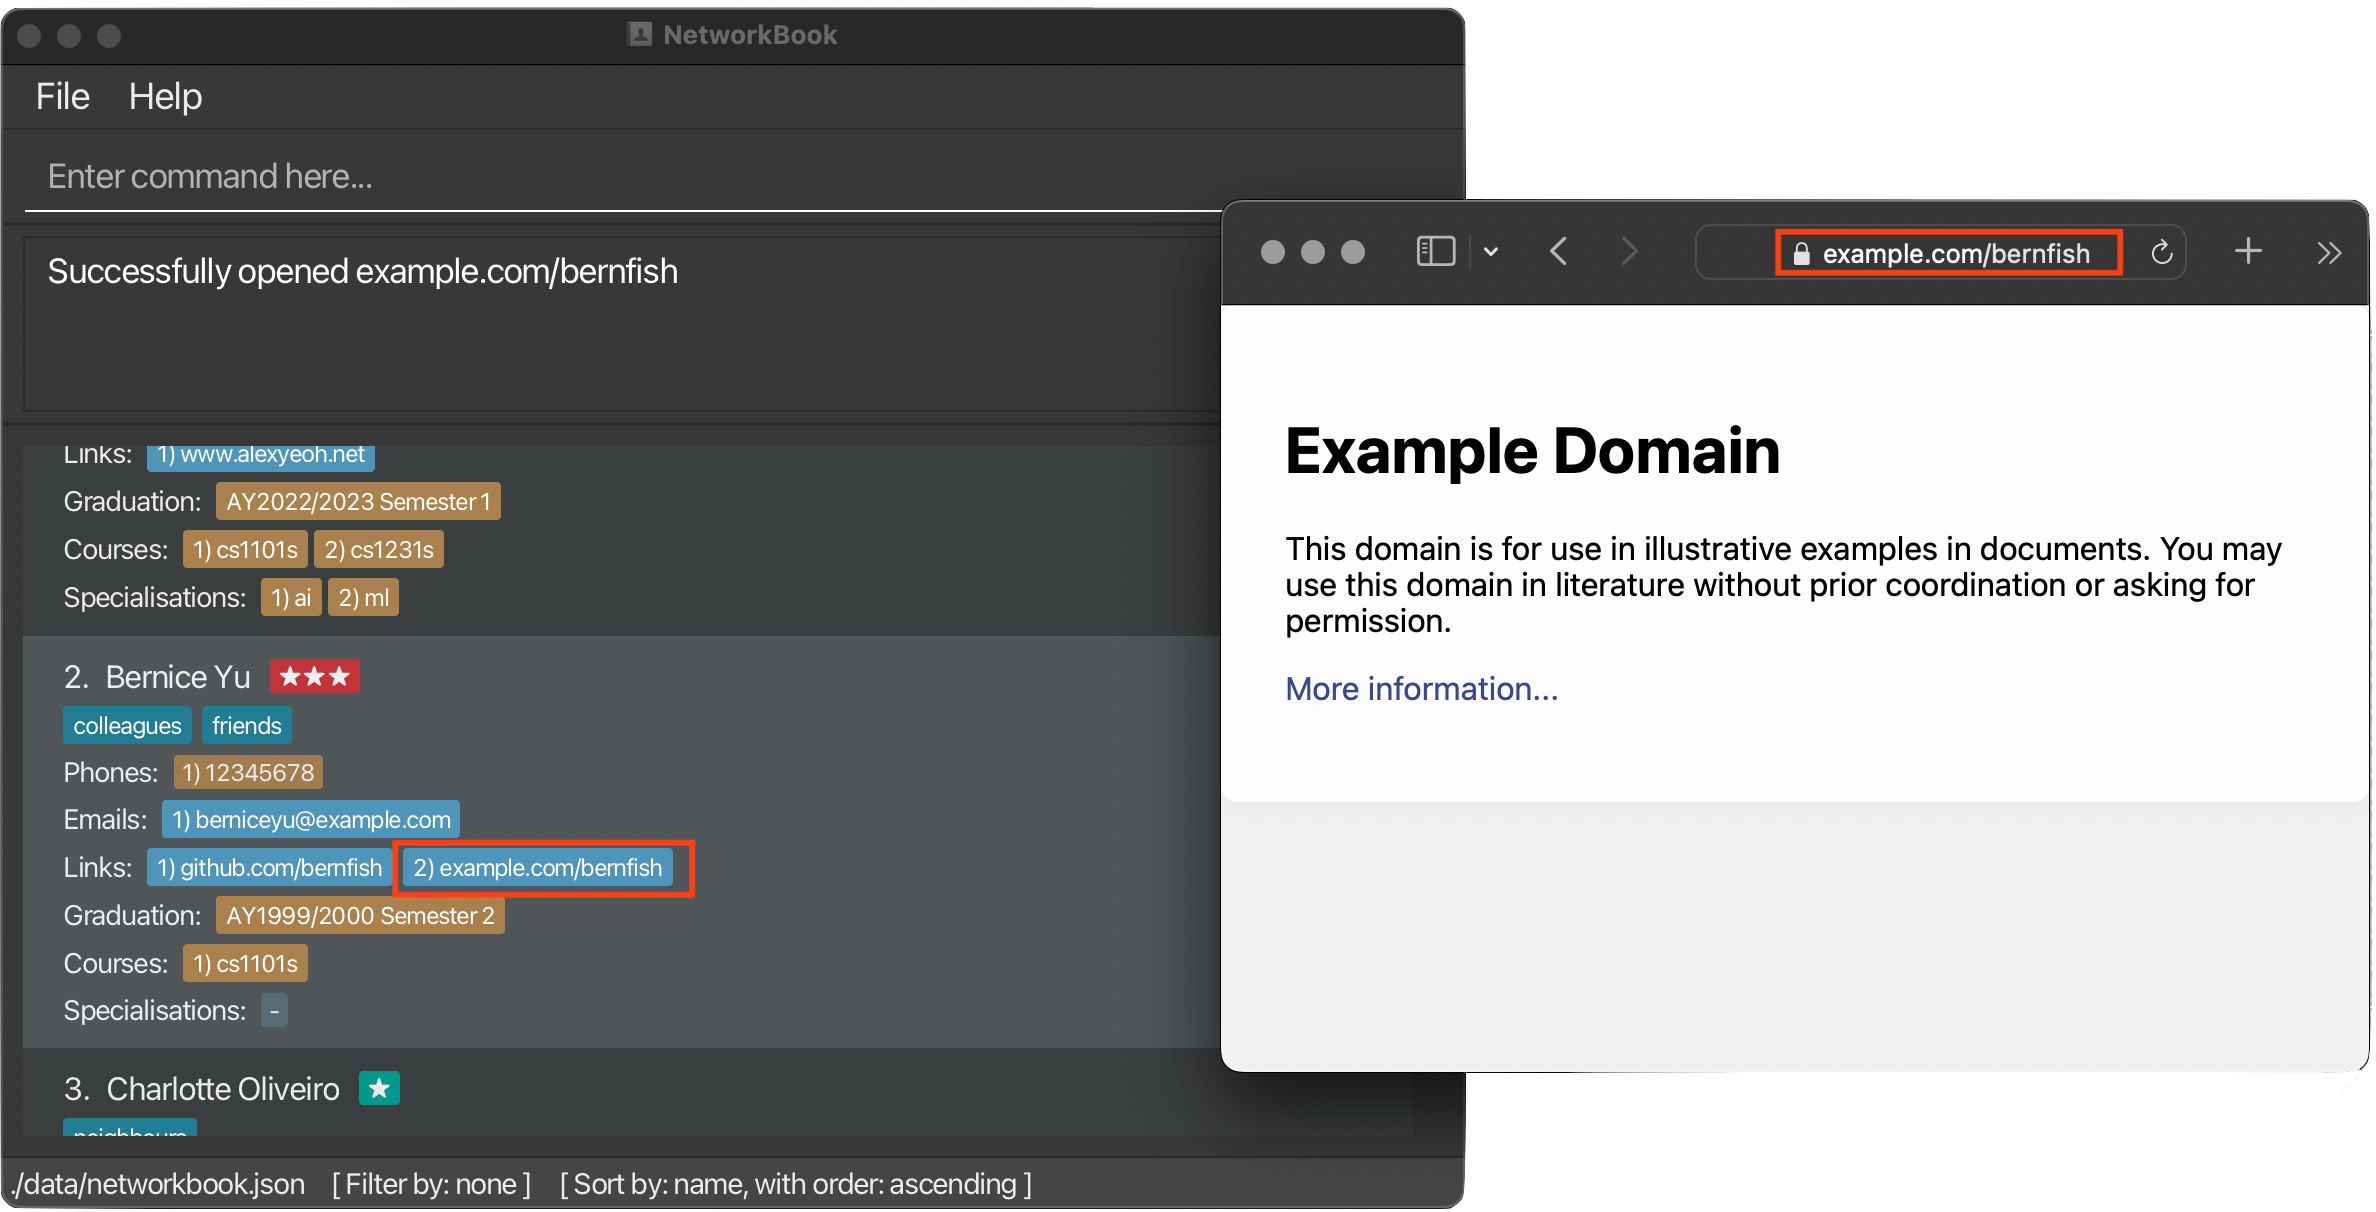
In the screenshot above, the 2nd link of contact #2 (Bernice Yu) has been opened in a web browser.
Note: The web browser used will be your computer’s default web browser.
-
open 1
Send email to a contact’s email address: email [index] /index [email index]
You can use the email command to open the default mailbox application to compose an email to the contact’s email at email index, so that you can send emails to your contacts more efficiently.
Format: email [index] /index [email index]
Parameters:
-
[index]is the index of the contact in the list. -
[email index]is the index of the email address within the contact’s email list.
Example usage:
-
email 1
In the screenshot above, a new draft email has been created, addressed to the the 1st email address of contact #1 (Alex Yeoh).
Note: The email app used will be your computer’s default email app.
-
email 1 /index 2
Category 3 - Miscellaneous commands
This category covers miscellaneous commands for additional functionalities in NetworkBook. Relevant commands and explanations of their functionalities are outlined below:
Undo last change to NetworkBook: undo
You can use the undo command to undo the last change to the list of contacts stored in NetworkBook and/or the list of contacts displayed by NetworkBook, so that you can quickly revert mistaken/temporary NetworkBook commands (excluding undo). This command can only undo changes made in your current session on NetworkBook.
Format: undo
Parameters: N/A
Example usage:
undo
Redo last undone change: redo
You can use the redo command to redo the last change to the list of contacts stored in NetworkBook and/or the list of contacts displayed by NetworkBook, so that you can quickly revert mistaken/temporary undo commands. This command only works if you have previously used undo commands in NetworkBook that can be reversed.
Format: redo
Parameters: N/A
Example usage:
redo
View help window: help
You can use the help command to open a help window containing a link to this user guide. You can press the “Copy URL” button to copy the link, and paste it into your web browser to view this user guide web page.
Format: help
Parameters: N/A
Example usage:
help

Manually save to data file: save
You can use the save command to manually save your contacts to the data file.
Format: save
Parameters: N/A
Example usage:
save
Exit NetworkBook: exit
You can use the exit command to close the NetworkBook app.
Format: exit
Parameters: N/A
Example usage:
exit
Category 4 - Accessibility features
This category introduces available interactions using keyboard and mouse that add more scaffolding to your networking experience. Relevant features are outlined below:
Keyboard shortcuts
NetworkBook supports many convenient keyboard shortcuts for you to execute commands efficiently.
Auto-fill command preamble: ctrl-F/N/G/U/R
When typing in the command box, if the command box is empty, you can use the following keyboard shortcuts to auto-fill the first word of some commands:
-
ctrl-F: auto-fill withfind -
ctrl-N: auto-fill withcreate -
ctrl-G: auto-fill withedit -
ctrl-U: auto-fill withundo -
ctrl-R: auto-fill withredo
Navigate command history: Up/Down arrow keys
When typing in the command box, you can use the arrow keys to fill the command box with a previously executed command.
-
Up arrow key: navigate back to the previous command in the history, if any. -
Down arrow key: navigate forth to the next command in the history, if any.
Undo/redo last change: ctrl-Z/Y
When not typing in the command box, you can use the following shortcuts to quickly execute an undo or redo command.
-
ctrl-Z: undo last change to NetworkBook (equivalent toundocommand) -
ctrl-Y: redo last change undone (equivalent toredocommand)
Other useful shortcuts: ctrl-S/W, F1
-
ctrl-S: manually save to data file (equivalent tosavecommand) -
ctrl-W: exit NetworkBook (equivalent toexitcommand) -
F1: view help window (equivalent tohelpcommand)
F1 key is bound to a different function in your computer settings, the keyboard shortcut to view help window may not work as expected.
Mouse interaction
While NetworkBook is optimised for use with keyboards and text commands, it also has buttons you can click to execute certain commands.
Filter (equivalent to filter command)
You can click on a contact’s tag, course, graduation, or specialisation to view all contacts with the same tag/course/graduation/specialisation.
Open link (equivalent to open command)
You can click on a contact’s link to open the link in your web browser.
Email contact (equivalent to email command)
You can click on a contact’s email address to draft an email to the contact.
Command summary
| Command | Prefixes | Format and examples | What it does |
|---|---|---|---|
| create |
/name [/phone] [/email] [/link] [/course] [/spec] [/grad] [/priority] [/tag]
|
create /name [name] [optional fields] e.g., create /name Oreki create /name Ness /phone +6598765432 /grad AY2526-S2
|
Creates a new contact in NetworkBook. If optional fields are provided, their values will be added to the contact. |
| add |
[/phone] [/email] [/link] [/course] [/spec] [/grad] [/priority] [/tag]
|
add [index] [field prefix] [field value] ... e.g., add 2 /email test@eg.com add 1 /link https://nknguyenhc.github.io/ add 1 /priority high /grad AY2223-S1
|
Adds information to a contact. |
| edit | Single-valued fields: [/name] [/grad] [/priority]Multi-valued fields: [/phone] [/email] [/link] [/course] [/spec] [/tag]
|
Single-valued fields: edit [index of contact] [field prefix] [field value] e.g., edit 1 /name Nguyen edit 1 /grad AY2627-S1 Multi-valued fields: edit [index of contact] [field prefix] [field value] (default to index 1) e.g., edit 1 /email aaa@gmail.com edit 1 /course CS2109S /index 1
|
Edits information about a contact. |
| clear | N/A | clear |
Deletes all contacts from NetworkBook. |
| delete | N/A |
delete [index]e.g., delete 1
|
Deletes a contact from NetworkBook. |
| delete | Single-valued fields: [/grad] [/priority]Multi-valued fields: [/phone] [/email] [/link] [/course] [/spec] [/tag]
|
Single-valued fields: delete [index of contact] [field prefix]e.g. delete 1 /priorityMulti-valued fields: delete [index of contact] [field prefix] (default to index 1) delete [index of contact] [field prefix] /index [index of entry] e.g. delete 2 /spec delete 3 /email /index 2
|
Deletes some details of a contact. |
| list | N/A | list |
Lists all saved contacts. |
| find | N/A |
find [name] e.g., find Ness
|
Searches for contacts by name. |
| sort |
/by [/order]
|
sort /by [field] /order [order]e.g., sort /by priority /order desc
|
Sorts contacts by a field. |
| filter |
/by /with [/taken]
|
filter /by [field] /with [term] e.g. filter /by course /with abc filter /by tag /with banker For course: filter /by course /with [term] [/taken true/false] e.g. filter /by course /with abg /taken false
|
Filters contacts by a field. |
| undo | N/A | undo |
Undoes the last change to the NetworkBook’s full list of contacts and/or list of displayed contacts. |
| redo | N/A | redo |
Redoes the last change to the NetworkBook’s full list of contacts and/or list of displayed contacts. |
| open | [/index] |
open [index] (default to index 1) open [index] /index [link index] e.g., open 1 e.g., open 1 /index 2
|
Opens a contact’s link in the default browser. |
[/index] |
email [index] (default to index 1) email [index] /index [email index] e.g., email 1 e.g., email 1 /index 2
|
Opens default mailbox to compose a new email to a contact’s email address. | |
| help | N/A | help |
Opens a window containing a link to this user guide. |
| save | N/A | save |
Manually saves contacts to data file. |
| exit | N/A | exit |
Exits NetworkBook. |
FAQ
Launching NetworkBook
Q: How can I launch NetworkBook if the clicking on the JAR file does not work on my Windows computer?
A: If you are familiar with the command prompt, you can follow the steps below:
- Open command prompt on your computer
- Navigate to the directory where the JAR file is located using
cd [JAR file location] - Type
java -jar networkbook.jarand press enter - NetworkBook should launch
If you have any further issues, please raise an issue on our GitHub page. We will attend to you as soon as we can.
Checking Java version
Q: How can I check my Java version?
A: Open command prompt (Windows) or terminal (MacOS or Linux) on your computer, and type java -version. If you do not have Java installed, you can download it here.
Loading data from another device
Q: How can I load my contacts stored in NetworkBook used in another device?
A: Locate the data file stored at [JAR file location]/data/networkbook.json. Copy over the data file to the corresponding location on your current device. After that, launch NetworkBook to check whether your contact details have been loaded properly.
Editing data file manually
Q: Can I edit the data file for NetworkBook manually (i.e. from outside the NetworkBook app)?
A: You can edit the data file for NetworkBook manually, but at your own risk (if there are errors in the file related to formatting/invalid data, the app will not read the data file and begin from an empty data file instead.)